Thursday, 26 April 2018

4 Simple Movements in Which Most Athletes Struggle

When I was in elementary school there was a lot more gym time, recess, and free play than there is today. Unfortunately, early sports specialization has replaced free play and now young athletes struggle with simple movements in which their parents tend to be proficient. Improvement in these movements will allow you to perform better at sports with a lower risk of injury. In the last couple years, I’ve seen more young athletes struggle with these four simple movements: crawling, skipping, hip hinging, and the push-up.


This is what we did for fun in kindergarten!

Crawling


The Bear Crawl

When’s the last time you crawled? The bear crawl is a physically challenging exercise whether done poorly or done well. The difference between a good bear crawl and a bad one is control. Can you balance the ball on your back (see video)? Crawling is an important skill for athletes for the following reasons:

It improves communication between the right and left hemispheres of the brain
It trains the core to control rotational movements
It trains the core to transfer forces between one arm and the opposite leg and vice versa

Most sports movements require these abilities such as throwing a baseball, running, freestyle swimming, kicking a soccer ball, taking a slapshot, and swing a golf club.

If you struggle with bear crawl, then regress back to the bird dog and crawling as an infant does with the knees touching the floor.


Bird Dog

Skipping

Ask your mom if she knows how to skip. Almost all my adult clients can skip properly even though they may not have done the movement for decades. The same can’t be said for my teen athletes unless they’ve spent some time working with a track coach. Kids typically raise the same side arm and leg instead of the opposite arm and leg.


A-Skip

Skipping is a diagonal movement just like crawling so it can be improved with the same exercises. Regress the skip back to marching on the spot, then progress through forward marching, skipping on the spot, forward skipping, and finally skipping in multiple directions. For strength training perform the single leg Romanian deadlift.

Single Leg Romanian Deadlift

Hip Hinge

Hip Hinge

The hip hinge allows an athlete to flex and extend the hips without losing proper posture. This will allow the athlete to jump higher and run and skate faster while reducing the risk of developing back pain. The hip hinge is your athletic ready position in most sports.

Develop the hip hinge with the stick hip hinge drill and then progress to the deadlift.


Stick Hip Hinge Drill

Push-Up

Push-Up

The push-up is much more than an exercise to develop pressing strength. It’s also a measure of core stability. If you can’t perform a proper push-up you’ll either be expending more energy to perform a task, moving slower, or be using the spine itself to stabilize the movement. The latter can lead to back pain. Unfortunately, this exercise is rarely regressed, and kids end up looking like inchworms.

How most kids look when doing a push-up

Regress the push-up to a hands-elevated version and work your way back down to the floor.

Hands Elevated Push-Up


Improve your ability in the crawl, skip, hip hinge, and push-up to perform better at your sport with a lower risk of injury. 

For more information about Pratt's Pro Fitness please visit my website.

Stay fit,
Jonathan Pratt

Thursday, 12 January 2017

What Does Training for Performance, Health, and Body Composition All Have In Common?

What Does Training for Performance, Health, and Body Composition All Have In Common?
A Quick Look at What I Do at Pratt’s Pro Fitness

My Story

I began my fitness journey with lifting weights in the seventh grade so as not to be bullied. Then, in the eighth grade, I found out I was a good runner and it was something I enjoyed. During my first couple of years I had no little or no coaching and even though I competed in high school cross country and track I trained on my own for much of the year. This is how I learned: through self-experimentation and many mistakes. I ran a lot faster, but I had developed periodic pain in my knees, shins, low back, feet, Achilles tendons, left ankle, and right shoulder. I studied long and hard just to stay in the game and this led to me eliminating most of these issues. From these experiences, I’ve developed a system based around staying in the game. Ask yourself this, “Wouldn’t it be easier to achieve your fitness goals if you weren’t constantly broken down?”

This article is for anyone who may be interested in training at Pratt’s Pro Fitness as well as for current clients. By reading this article you’ll develop a better understanding of the work I do here and learn answers to some frequently asked questions. You may even choose to use it to improve the program you use at your gym.

Summary

Everyone here trains like an athlete. My clients work hard but nothing we do is considered hardcore; instead of trying to make you puke or develop crippling soreness I believe in gradual overload. I wouldn’t consider anything I do to be cool nor do I do things because they’re trendy. I simply stick to what works based on my observations and what’s supported by research.

Functional Movement Screen

Movement is the foundation of every program I write whether your goals are athletic development, improved function, or fat loss. I use the Functional Movement Screen and other tests to gain a greater understanding of your strengths and weaknesses, identify any pre-existing pain, and determine exercise selection. Not only has the information from the FMS helped me eliminate my own injuries, but I’ve also helped clients eliminate chronic low back, knee, hip, and shoulder pain.

Image result for functional movement screening
The Functional Movement Screen is a simple way to measure movement quality and aid in exercise prescription.

Periodization

Periodization simply means doing the right thing at the right time. There are no random workouts or exercises. By making changes to your program every few weeks you can make faster gains, decrease your risk of injury, and reduce boredom. On the other hand, it’s possible to switch it up too frequently and see poor results. My training phases usually last 4 weeks. Instead of making a complete overhaul every 4 weeks it’s best to make small modifications such as changing the sets and reps scheme or using a different variation of the same exercise.

Sample Athlete Periodization
            Phase 1: Anatomical Adaptation – Preparation for later phases
            Phase 2: Maximum Strength – Stronger athletes can develop greater power
            Phase 3: Power – Power is the key to sprinting, agility, and jumping
Phase 4: In-Season Strength/Power – Strength and power must be built during the competitive season albeit with a greater emphasis on recovery for competition

Sample Fitness and Fat Loss Periodization
            Phase 1: Accumulation – High volume develops joint health and builds/maintains muscle
            Phase 2: Intensification – Heavier weights develop strength
            Phase 3: Accumulation
            Phase 4: Intensification

Workout Overview

Workouts generally take 60 min as shown below, but some individuals need more or less time to complete an appropriate workload. In a one-on-one setting this workout can be completed in 45 min.

All my clients train like athletes although there’s great contrast in programs based on ability. Thus, programs tend to be similar but it’s rare to find two that are identical even among clients who are matched up by age, gender, and goals. At this point you might point out that you’re no athlete. But, how would you feel if you had an athlete’s pain-free quality of movement or trim figure?

Sample 60min Workout
5min Foam Rolling
15min Warm-Up
10min Power
                        Perform 3x
                                    Lower Body Power
                                    Upper Body Power
                                    Loaded Carry
30min Strength
            Perform 3x
                        Hip Dominant
                        Upper Body Push
                        Core
                        Mobility/Stability
            Perform 3x
                        Knee Dominant
                        Upper Body Pull
                        Core
                        Mobility/Stability
           
Foam Rolling

Foam rolling is a type of self-massage. It allows us to get more out of the mobility work that follows and reduces soreness from previous workouts. I’ve found foam rolling to be a game changer. When I’m running a lot, I can barely move first thing in the morning without it. A lot of pain tends to be referred pain from overworked muscles too.

A couple OFSAA medalists and a national team member foam rolling at PPF.

Warm-Up

A proper warm-up enhances performance on your workout and reduces the risk of injury. Instead of holding our stretches for 30 s (i.e. static stretching), we prepare for strenuous exercise by gaining range of motion through movement based stretching (i.e. dynamic stretching). While a proper warm-up can easily be done in 10 min I extend the warm-up with injury prevention exercises. Commonly tight muscles are stretched while commonly weak muscles are strengthened. These exercises are most effective in the long term rather than for the workout that follows. I began doing this type of work with my high school cross country team this year daily and it was the first time no one developed shin splints or needed to take a day off due to something hurting.

I even spend a minute on your breathing. Proper breathing alters muscle tone throughout the body. I had an intern perform one drill for five breaths and when she got up her back pain was gone and her shoulder mobility had improved!

The warm-up concludes with exercises that prepare you specifically for the workout such as lunges, squats, and agility ladder work.

Power Training

Power is a key quality for athletic performance. For health purposes, power is lost faster than strength as one ages but is important for aiding in fall prevention and going up stairs. I like to develop power for athletes using plyometrics and Olympic lifting. Those who are trying to improve health or lose body fat don’t need such extreme exercises and are better served by performing kettlebell swings and running through the agility ladder.

Resistance Training

Resistance training is an umbrella term for training to develop strength, power, and muscle growth (i.e. hypertrophy). All programs at PPF involve lifting moderate to heavy weights, although your current level of fitness may require you to begin with learning to control your own bodyweight or to have your bodyweight supported.
Athletic Performance: Resistance training has been shown to improve power, speed, speed endurance, vertical jump, agility, and endurance and reduce the risk of developing injuries.
Fat Loss: All exercise is beneficial for fat loss, but if you have limited time lifting moderate to heavy weight is more effective at reducing body fat than cardiovascular training. Resistance training elevates resting caloric expenditure and helps you maintain your muscle mass while in a caloric deficit. More muscle means more calories burned. One of my clients lost over 50 lbs this year through resistance training twice a week and dieting. There was no cardio work and walking was done irregularly.
Health: Resistance training reduces body fat, improves your ability to perform basic tasks, reduces the risk of developing osteoporosis, and reduces age-related muscle loss.

Circuit Training

Pairing exercises or grouping several exercises into circuits allows you to get more work done in less time. I program the circuits to take roughly 5 min and group together non-competing exercises. This means that when one muscle group is trained it gets about 4 min of rest before it gets trained again. When performing a strength exercise, it’s best for at least 3 min before performing that same exercise again to maximize results. Although this style of program design isn’t effective for athletes with advanced levels of strength (e.g. weightlifters and powerlifters) most athletes will benefit from it. For fat loss, the term metabolic resistance training is used and it appears to be the most effective exercise for this goal.

Free-Weights vs. Machines

I use free-weights (i.e. dumbbells, kettlebells, and barbells) rather than machines because free-weights focus on natural movements rather than isolating single joints/muscles. Free-weights are better for improving performance and movement quality and because they activate more muscles they’re more effective for burning calories. You would have to perform a lot of machine exercises to target all the muscles involved in the deadlift. In fact, I recently found some of my old workouts where I was performing 15 strength exercises in addition to core training. Now I tend to do five. I Once I stopped performing isolated quad exercises I stopped straining my hamstrings.

Strength Exercises

Stronger athletes gain more from power training as power is the product of strength and speed. For the rest of you, being strong means that you can carry your children without injury, carry a lot of groceries, open jars, and climb stairs with ease. Strength has also been linked to mortality.

All human movements can be reduced to a few patterns:
knee dominant (squats and lunges)
hip dominant (deadlifts)
upper body push (push-ups and presses)
upper body pull (rows and chin-ups)
locomotion (carries)

That’s it? Yes!

Pareto’s Law tells us that 80% of our results come from 20% of our actions. In other words, a few fundamental exercises which have stood the test of time are going to get you to your goals.

But won’t I be bored?

Don’t worry. As you progress you’ll be able to rotate between many variations. Take the split squat for example. You could progress from the split squat to the Bulgarian split squat and later the Valslide reverse lunge, reverse lunge, and deficit reverse lunge. You can perform these movements for high repetitions, low repetitions, slowly, with pauses, one kettlebell or two, or with a barbell. Too advanced for you? You might begin with a band assisted split squat.

Athletes should note that at no point will I have you mimic your sporting movement with a weight or resistance band. Research shows that this interferes with skill development. Training at PPF isn’t about being sports-specific; playing your sport is sports-specific. Instead, the goal of training at PPF is to develop your body to the point where it will do whatever you (or your coach) ask of it.
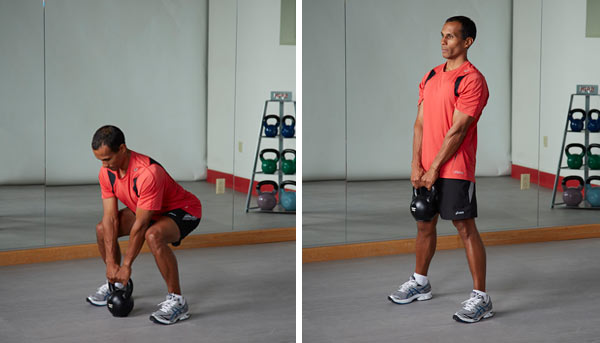
Image result for kettlebell deadlift
The kettlebell deadlift is a beginner exercise that works nearly every muscle.

Mobility and Stability Training

When I refer to mobility I’m referring to range of motion about a joint or series of joints. Stability is control in the presence of change. Where most people go wrong is increasing their mobility through stretching without adding stability to their newfound range of motion. This leaves one susceptible to injury. I’ve also seen many cases where a lack of stability is the reason my client couldn’t achieve the right position.

At PPF I focus on developing mobility of your ankles, hips, and upper back, while developing stability in your lower back and around your shoulder blades as per the Joint-by-Joint Approach developed by Mike Boyle and Gray Cook.

Core Training

Core training at PPF isn’t about making your abs burn with 30min of core work. While this type of training might be beneficial for bodybuilding, the goal of core training is to improve the function of your muscles in-and-around your midsection and hips so that they work while you’re doing squats, push-ups and other exercises. Therefore, only a few isolated core exercises are needed as every exercise becomes a core exercise.

It used to be that the core was trained by bending forward, sideways, and backward with crunches, side bends, and supermen, but research by Stuart McGill has shown us that there are safer more effective exercises such as planks, suitcase carries, and bird dogs. 

Image result for suitcase carry
The suitcase carry develops core and hip strength without causing wear-and-tear on your spine.

Conclusion 

At Pratt’s Pro Fitness performance, health, and improved body composition are developed through strength training with a focus on sound technique and injury prevention. Everyone here trains like an athlete.

If you or a friend have any more questions about Pratt’s Pro Fitness or any health and fitness related questions, please contact me through my website listed below.

Stay fit,
Jonathan Pratt


Thursday, 14 April 2016

Improve Your Finishing Kick Part 1

It's been a long time since I've posted a blog, so I thought I might try a video blog.


Sty fit,

Jonathan Pratt
Pratt's Pro Fitness

Friday, 6 November 2015

If It Hurts Don't Stretch It

When something hurts the first thing many people try to do is “stretch it out,” but this can prolong your pain. Now, there’s nothing wrong with stretching; it’s just that you’re probably targeting the wrong area. This is where some kind of an assessment by a chiropractor or physiotherapist is key. There are no good or bad exercises in general for any painful area. Only an assessment can ultimately tell us what will be of use. However, I've provided some general guidelines. 

Tips

Painful Area: Muscle

Solution: Stretching an injured muscle places even more strain on that muscle. In many cases that muscle wasn’t strained because it was weak but because it was overworked. Once the muscle is healed focus on strengthening other muscles that perform the same action as the injured muscle (i.e. strengthen the muscle’s synergists).

Painful Area: Knees and Low Back

Solution: Joint segments such as the knee and the low back area are often injured because they move excessively in response to poor movement at adjacent joint segments.  Instead of performing stretches or mobilizations for a painful joint try improving range of motion at the hips and ankles.

Painful Area: Low Back

Solution: Stretching the back often gives temporary relief, but could be giving you problems in the long run. Instead of stretching the low back improve the strength of the glutes and abdominal muscles. Perform glute bridges, clam shells, and plank variations.

When done properly (i.e. without flexing or extending the low back) the bird dog is a great exercise for those with low back pain.

Painful Area: Shoulder

Solution: The shoulder is the least stable joint in your body. Instead of stretching the smaller rotator cuff muscles stretch larger muscles such as the pecs and lats. In addition, perform shoulder stabilization exercises such as farmer’s walks, waiter’s walks, push-ups, and rowing variations.  

Painful Area: Neck

Solution: Visit a chiropractor. The neck is a rather delicate area.

Painful Area: Butt (Sciatica)

Solution: Again, a chiropractic adjustment may be needed. Many sources suggest stretching the piriformis a deep butt muscle, but according to Shirley Sahrmann this muscle is typically already in a lengthened position on the painful side. Thus, if stretching the outside of your hips (or performing squats, lunges, or deadlifts) increases your symptoms, then try clam shells.


Stretching is beneficial to your body, but don’t stretch painful areas. Instead, seek an expert and try the tips listed above. 

Stay fit,

Jonathan

Monday, 22 June 2015

Gait Retraining for Shinsplints

I’ve read a lot of articles and books on injury prevention and biomechanics for running and I’ve been disappointed with what has been written with regards to shin-splints. In fact, the physiotherapy textbook Movement System Impairment Syndromes (2011) by the highly regarded Shirley Sahrmann only has a couple paragraphs devoted to the subject.

My main issue has been that the research often equates “shin-splints” with “medial tibial stress syndrome” (MTSS). But, MTSS is a bone injury. What about all those runners who complain about the front of their shins feeling stiff? Is this due to simply having a weak tibilias anterior? This was my case in grades 9/10. I trained this muscle by leaning back against a wall and using my shin muscles to pull my feet up. The recommendation was three sets of ten, but I couldn’t even perform one set. Improving the strength of my tibilias anterior gave me temporary relief and may have set me up for success later down the road. I’ve always wondered if these symptoms could be due to blood getting trapped in around the shins. This is called compartment syndrome and in extreme cases requires surgical intervention to release the pressure. Fortunately, I can only think of one runner who required this: Said Aouita, arguably the most versatile runner to ever live.

A recent study on shin-splints by Breen and Colleagues (2015) used the terms “chronic exertional compartment syndrome”, “exercise induced lower leg pain”, and “anterior exertional lower leg pain”. They listed symptoms as incremental pain on exercise described as “tightness” or “constricting pain”. The pain gets worse until the runner is forced to stop. Often the pain reduces the function of the lower leg causing the foot to slap. Symptoms are usually worse when running uphill and will only decrease with rest. Myofascial release, stretching, orthotics, massage, and reduced training have been used to treat this condition, but with little success.

Previously Diebal and Colleagues (2012 and 2011) had good outcomes on reducing symptoms through teaching runners to adopt a forefoot strike. Adopting a forefoot strike might be ultimately how I eliminated my shin-splints. Drawing upon this research, Breen and Colleagues (2015) went one step further and taught runners with shin-splints several ways to reduce the exertion on their lower legs. Using video analysis they were able to show the runners what technical mistakes they were making and then used video analysis to show improvements. Technical changes were given through verbal feedback and sessions consisted of drills and walk/runs. Verbal cues were catered to the runner and included the following:
            Midfoot strike
            Earlier foot lift-off to promote greater stride frequency
Slightly increased hip flexion (i.e. lifting the knees higher to offset any shuffling from the increased stride frequency)
Decreased forward lean


As expected the initial changes in technique led to an increase in effort. Magness reports research in The Science of Running (2014) that runners are most economical at their self-selected stride length. However, after one year following the intervention 9 out of the 10 subjects responded to the gait changes with 7 runners running pain-free and one runner now able to run pain-free for 80 minutes. The extra training volume would easily overcome any temporary decreases in running economy.

A recent review study supports Breen’s and Colleagues (2015) results. Sullivan (2015) highlights research showing that gait retraining in the form of changing to a midfoot or forefoot strike as well as increasing stride frequency by 10-15% is effective at preventing lower extremity overuse injuries. He was careful to note that changing to a midfoot or forefoot strike alone wasn’t enough to reduce ground reaction forces. The foot must land under the body.
             
Adopting a forefoot or midfoot strike, increasing stride frequency, and decreasing forward lean are all ways to eliminate shin-splints. Gait retraining is an effective way to eliminate shins-splints and other overuse injuries in the lower body.

References

Effects of forefoot running on chronic exertional compartment syndrome: a case series by A. R. Diebal and Colleagues (2011)
Forefoot Running Improves Pain and Disability Associated with Chronic Exertional Compartment Syndrome by A. R. Diebal and Colleages (2012)
Gait Re-Training to Alleviate the Symptoms of Anterior Exertional Lower Leg Pain: A Case Series by David T. Breen and Colleagues (2015)
Movement System Impairment Syndromes of the Extremities, Cervical and Thoracic Spines by Shirley Sahrmann (2011)
Retraining Running Gait to Prevent Lower Extremity Overuse Injuries: A Review of Literature by Daniel P. Sullivan (2015)
The Science of Running by Steve Magness (2014)

Stay fit,

Jonathan Pratt


Wednesday, 18 March 2015

Maintaining Spinal Health (Part 2)

In Part 1 I discussed the importance of posture for spinal health and how posture affected muscle tightness. Read Part 1 here. Just recently, I had my intern Melissa Parks perform the breathing exercise in that piece. After 5 breaths her back pain was gone and she had improved shoulder mobility.

Part 2: Mobility and Stability

When I meet with potential clients I always assess their movement capabilities. Using the criteria from Functional Movement Systems movement can fall into four categories:

Functional Non-Painful
Dysfunctional Non-Painful
Functional Painful
Dysfunctional Painful

The painful movements are handled by a health care provider, although I regularly work with clients experiencing chronic pain. I eliminate all the painful movements from the program and attack all the dysfunctional non-painful movements. You can still get in a full workout with low back or knee pain.

Often attacking dysfunctional movement elsewhere can eliminate your pain. A 2007 review paper by Wainner and Colleagues called this regional interdependence – each segment of the body impacts other segments. They identified a number of studies that supported this. In particular, the hip was often involved with low back pain.

I look at full body movement as well as breaking the body down into segments. A simple yet effective way of training each segment of your body is Mike Boyle’s and Gray Cook’s Joint-by-Joint Approach to Training (Cook and Colleagues, 2010). While all joints require a basic level of mobility and stability, some areas require more of one than the other. For the purpose of this article I’ll define mobility as the ability to move a joint through its full range of motion and stability as the ability to control that motion.


Requirements According to the Joint-by-Joint Approach

Ankle: Mobility
Knee: Stability
Hip: Mobility
Lumbar Spine: Stability
Thoracic Spine: Mobility
Scapulothoracic Joint: Stability
Glenohumeral Joint: Mobility

Notice how the lumbar spine requires a lot of stability rather than mobility. Many people have more than enough mobility here. Hence, I don’t recommend stretching your low back unless otherwise recommended by your chiropractor. While I have many of my clients perform five gentle repetitions of cat/camel from yoga as recommended by Stuart McGill (McGill, 2007), I don’t have them performing any sort of sustained low back stretches. Stretching the low back often feels good temporarily, but may be preventing you from eliminating your back problems for good (McGill, 2007). In pain-free individuals some spinal movement is encouraged as it enhances nutrient uptake into the spinal discs (Contreras and Schoenfeld, 2011).

Note: Eliminate any exercise that causes pain.

Stuart McGill found that 5-6 repetitions of the cat/camel greatly reduced low back stiffness, but there was little gain from performing more than this (McGill, 2007).

In addition to the Joint-by-Joint Approach we can learn from Vladimir Janda. Decades ago he saw that most people had the same dysfunctions. He called these common dysfunctions upper and lower crossed syndrome. From Janda we learn that it’s beneficial to strengthen the gluteals, anterior core muscles (particularly the external obliques), and lower traps, while stretching the hip flexors, pectorals, and lats (Page and Colleagues, 2010).


I’m going to focus on lumbar stability and hip mobility in this piece, because they seem to be most often related to low back pain.

Hip Mobility

Foam roll: Focus on the quad/hip flexors, hip adductors (inner thighs), and hip external rotators (butt) 

 Static and dynamic stretches: work on the same muscle groups as with the foam roller. You can either hold the stretches for 30-60 sec or move in and out of the stretched position.


Core Stability: The low back muscles are often strong enough, because they're overworked due to lack of support from the gluteals and abdominal muscles. Instead of performing hundreds of crunches it's better for your back to perform anti-extension and anti-rotation exercises. In addition, strengthen your glutes.


A resistance band can also be used.


Many people - especially those with low back pain - require improved mobility in the hips and improved stability in the lumbar spine. The low back also requires support from the gluteals and abdominal muscles.

Stay fit,

Jonathan Pratt

Thursday, 19 February 2015

Maintaining Spinal Health (Part 1)

Recently, I was a guest speaker on spinal health at Inside Out Chiropractic where my gym is located. I spoke about how exercise could both maintain spinal health and in some cases eliminate low back pain. In addition, I demonstrated safe ways to repetitively lift light objects and how to lift heavy objects.

Spinal health was a good topic for me. I wasn’t good at any of the team sports when I was young, so I didn’t get a lot of physical activity. It wasn’t until I was in grade 7 where participation in volleyball and basketball were mandatory at our school that I started to enjoy physical activity. I also added weight training and track and field (400 m) that year.

Because I wasn’t very active early I lost some basic mobility and stability. When I began strength training the exercises I performed focused solely on the muscles on the front side of my body. So, by the time I was finished high school I had decent strength and I was a good runner, but by low back hurt when I slept (and sometimes when running), I couldn’t touch my toes, and I had difficulty sitting up straight for long periods.

Why Is Spinal Health Important?

Spinal health is important firstly because of the nerves branching off from your spinal cord. A vertebra that’s out of place or poor posture can pinch these nerves causing radiating pain. Moreover, damage to any of the spinal structures (e.g. discs, ligaments, or vertebrae) can have pain associated with it. While this pain in itself is unpleasant pain alters muscle tone and movement strategies. That is, some muscles develop increased tension, while others become inhibited/weak. There are short-term benefits to this but long-term consequences such as more pain from overuse or decreased performance.

Keys to Maintaining Spinal Health

In order to maintain or improve spinal health we need to work on number of things:

Posture
Mobility and Stability
Fundamental Movements
Strength and Conditioning
Technique

While each of these is important to spinal health the qualities higher on the list have an effect on those lower on the list.

Important Notes

If you experience pain you need to get it checked out by a healthcare professional. The healthcare professional can accurately diagnose your pain and place you on the proper treatment plan. They can also provide you with a list of contraindicated exercises, which may include some of the exercises in this series of posts. This is important as the exercise that helped eliminate Steve’s low back pain could exacerbate yours. Furthermore, manual therapy is often required along with exercise for a successful outcome.

Part 1: Posture

Good posture is important for spinal health as previously mentioned in the introduction. Moreover, posture affects muscle tone and how we breathe, which indirectly affects the other keys to maintaining spinal health. Some common postures are a rounded upper back/forward head and an arched back/anterior pelvic tilt.


According to the Postural Restoration Institute (PRI) created by Ron Hruska, posture can be improved by spending time in the right position (and avoiding the wrong positions), improving breathing, and performing various exercises to work on your deficiencies.  

Spending time in the right position improves posture, but it takes a long time. Be patient. If you have the posture issues listed earlier you can achieve the right position by lying on your back with your feet up as shown in the PRI video below. This brings your head into alignment and reduces the arch in the low back without having to work at it. I like to read from this position.

We also need to avoid the wrong positions. Avoid sitting for too long especially in a slouched position or with your head protruding forward. The amount of compressive force on the lumbar spine is 11 times greater when seated than when lying down, but it’s only three times greater when standing (McGill, 2007). However, some people are required to sit for long periods for work or school. In this case, Dr. Stuart McGill suggests that you constantly change your sitting position to alter the stress on your back and to frequently stand and take a moment to reach as tall as you can. Another good idea would be to limit the amount of time of spend wearing high heeled shoes.

Improving breathing often speeds up the process of improving posture. We want to be belly breathing almost exclusively while at rest gaining assistance by raising the chest up and out as we work harder. We want to avoid shrugging the shoulders when we breathe.

The easiest way to learn belly breathing is through crocodile breathing. Perform for up to 10min at a time. Be careful when you get up just in case you’re light-headed.

Expand your belly as you inhale using the floor for feedback.

For those who have an excessive arch in their low back PRI’s balloon breathing exercises work well. I’ve found using a balloon to be the most effective way of performing these exercises, but resisting your breath with a straw or pursed lips works well too.   


Using your legs lift yourself up slightly so that the low back is gently pressed into the floor. Inhale fully through your nose and allow your breath to expand your belly. Next, exhale fully (try for 10 sec), which will cause a contraction in your abdominal muscles.

Posture can be bettered through improved breathing, maintaining the right position, and various exercises (introduced later). Improved posture is key to maintaining a healthy spine.

Stay fit,

Jonathan Pratt
Pratt's Pro Fitness